SimCLR Explained: The ELI5 Guide for Engineers
Table of contents
Share blog post


Learn how SimCLR uses contrastive learning to train visual models without labeled data. Explore key components like data augmentation, encoders, projection heads, and contrastive loss — all explained in a clear, engineer-friendly way.
Share blog post
Below is some key information on SimCLR that you should know.
- What is SimCLR?
SimCLR (Simple Framework for Contrastive Learning of Visual Representations) is a self-supervised learning framework for images. It learns useful visual representations without any labels by training a neural network to maximize agreement between augmented views of the same image and minimize agreement between views of different images (i.e. a contrastive learning approach).
- How does contrastive learning work?
In contrastive learning, the model is shown two augmented versions of the same input image (a positive pair) and many other images as negatives. The model’s representation is learned via a contrastive loss that pulls together the positive pair in latent space and pushes apart representations of different images. Over training, the network discovers features that are invariant to the applied augmentations, since the only way to recognize two augmented copies as “same” is to capture high-level content.
- What is the role of data augmentations in SimCLR?
Data augmentations are critical in SimCLR – they generate the different views needed for the contrastive prediction task. Each image is randomly augmented twice (e.g. through random cropping, color jitter, and Gaussian blur) to create two correlated views. These augmentations inject variety while preserving object identity, forcing the model to learn robust, invariant features (e.g. focus on object shape rather than exact position or color). In fact, the combination of random crop + color distortion was found to be essential for good performance.
- How does SimCLR compare to supervised learning?
SimCLR does not use any labeled images during pretraining, yet after training its self-supervised representations can rival fully supervised models on image classification. For example, a linear classifier on SimCLR’s learned representations achieves ~76.5% ImageNet top-1 accuracy, matching a supervised ResNet-50. With limited labels, SimCLR excels: fine-tuning a SimCLR-pretrained model on just 1% of ImageNet labels far outperforms training from scratch (63% vs 52% top-1 accuracy in one experiment). However, SimCLR typically requires larger batch sizes and more training than supervised learning to reach those results. In practice, SimCLR can be used to pretrain models on unlabeled data and then fine-tune with labels, reducing the need for large labeled datasets.
One of the most influential papers on Self Supervised Learning is SimCLR by Chen et al. (2020). Self-supervised learning has proved to be a valuable strategy compared to traditional methods like supervised learning, which are limited by their dependency on labeled data. This severely limits their use in high-impact domains like medical imaging. For most medical imaging tasks, such as Whole Slide Identification or detecting artefacts in X-rays, datasets are not available at the scale of current models (most recent VLMs and transformers have > a billion parameters). Moreover, labelling is even more expensive in these domains, thereby making Supervised Learning almost impossible (fine-tuning might still be possible but not full-scale pre-training).
Self-supervised learning shines in such label-deficient industries.
Without the dependency on labels, one can exploit the web-scale collection of raw samples. At its core, Self-Supervised Learning defines a pretext task that enables learning rich representations from unlabeled data. These pretext tasks can take various forms, but perhaps the simplest and most influential is the task of restoring missing or distorted parts of an input. The most common form of this is the Masked Language Modelling underpinning the success of transformer-based models in Natural Language Processing.
Services like ChatGPT and Claude rely on billion-parameter transformer models that are pre-trained on such tasks. Words are randomly masked in a sentence, and the model is trained to predict the surrounding words. This forces the model to learn relationships between words without any explicit labels, such as entity tagging. Moreover, representations learnt in this manner can be used for several tasks ranging from summarization and translation to text generation (how we use LLMs these days).

In computer vision, models can be trained to predict image patches or contrast augmented views of the same image against others—forcing them to learn spatial relationships and invariant features.
This contrastive approach helps group similar representations while distinguishing different ones, resulting in robust, transferable vision models—much like Masked Language Modeling in NLP.
In this article we’ll systematically study and cover the following:
- What is SimCLR and Contrastive Learning Basics
- Data Augmentations in SimCLR: Generating Augmented Views
- Contrastive Loss (NT-Xent): The Loss Function in Latent Space
- SimCLR Training Procedure and Tips
- Evaluating Self-Supervised Representations
- SimCLR vs. Supervised Learning: Key Differences and Insights
- SimCLR Conclusion and Further Development
And if you’d like to have a visual explanation of SimCLR, we encourage you to check out this video:
Now, let’s dive in.
What is SimCLR and Contrastive Learning Basics
SimCLR is a landmark framework for contrastive learning of visual representations that helped push self-supervised performance to new heights. It was introduced by Chen et al. in 2020.

Developed by the Google Brain team (including Geoffrey Hinton), SimCLR demonstrated that with the right training strategy and some major components – simple augmentations, a contrastive loss function, and big batches – a model can learn image features almost as well as if it had full supervision. This was a compelling breakthrough at a time when models depended heavily on millions of labeled images for training. The SimCLR framework is part of the broad family of models known as the Deep Metric Learning family, which includes other prominent methods like NNCLR.
At its heart, SimCLR uses a contrastive learning objective: the model is trained to maximize agreement between different augmented views of the same image while minimizing agreement between views of the same example
In other words, if you take an image and create two altered versions of it, SimCLR will learn to output similar embeddings (feature vectors) for those two images. Meanwhile, embeddings of two different images should be far apart (dissimilar) in the latent space unless those images are visually similar by coincidence.
This approach is often described as an instance discrimination task: each individual image instance is treated as its own class. The only “label” the model gets is that two augmented images came from the same original (so they belong together) while other images in the batch are different. This forms the basis of a contrastive prediction task– given an image representation, the model must identify which other representation in the batch is the matching augmented view (the positive) among many negatives.
💡Pro tip: If you plan to train contrastive models locally, our Apple M1 and M2 Performance for Training SSL Models blog outlines the compute limitations and throughput you can expect on Apple Silicon.
Data Augmentations in SimCLR: Generating Augmented Views
Data augmentation is at the heart of SimCLR.
In SimCLR, two views of the same data example are generated by randomly sampling augmentations from a known family of “semantic preserving” transformations. In the case of SimCLR, two views are generated using either random resizing, cropping, colour jittering or random blurring.
An Encoder network is then used to create encodings of these augmented data examples. A typical choice for an encoder network is a traditional image backbone such as ResNet-50. Having generated such encodings of the two views of the same image, a projector network then maps representations into another representation space. A simple MLP network is chosen to act as the projector network. These resulting representations are then used to train the model using a contrastive objective.
Key data augmentation techniques
The SimCLR paper found that a specific combination of simple image augmentations was crucial for learning good representations. The three primary augmentations used (applied sequentially) are:
- Random cropping and resize: Randomly crop a portion of the image and resize it back to the original resolution.
- Random color distortion: Apply random changes to color properties (brightness, contrast, saturation, hue). Each augmented view gets its own color jitter, so that two views of the same image can have very different color distributions.
- Random Gaussian blur: Slightly blur one of the images (especially effective for images from high-resolution datasets).
Why data augmentation matters
Since we are attempting to learn without labels, where does the signal during training come from?
Because we are using a Contrastive Learning objective, the simple task of enforcing representations of different views of the same image to be similar forms the signal since there is some notion of two objects being similar (pseudo label).
Contrastive Loss (NT-Xent): The Loss Function in Latent Space
The evolution of SimCLR is closely tied to the emergence of Contrastive Loss. Here are the basics:
For a given pair of inputs, one tries to minimize the distance from the same class and maximize the distance if they are not (in some embedding space). If a function f maps a given input x to a vector and y denotes the label of the i-th sample.

- The first term in the loss function deals with items from the same class (same labels). We do this by minimizing the distance between any two samples.
- The second term, on the other hand, deals with items from different classes (samples with different y values). We try to maximize the distance between such samples about some epsilon, which is the minimum distance between distinct classes.
Variants of the same input image are called positive examples, while views of different images are called negative examples.
Given a dataset of unlabelled images, a random mini-batch is sampled, and augmented views are generated. After generating augmented views for N samples, we’ll get 2N data points (2 views of each sample). Note that we don’t explicitly search for hard negative samples. Instead, given a positive pair, all other 2(N-1) samples are treated as negative pairs.

This loss formulation is similar to the (N+1) loss typically used in Contrastive Learning. Instead of using the dot product of the latent representations directly, this loss function employs a cosine similarity function. The literature often refers to this formulation as NT-Xent (Normalized temperature-scaled cross-entropy loss).
With the availability of “positive” and “negative” samples, one might also consider employing a Triplet Loss. This formulation involves a margin parameter, say m, which enforces a minimum distance between the views of different images.

SimCLR Training Procedure and Tips
Let’s review some example code showcasing how to train a model using the SimCLR framework. We’ll be using LightlySSL - a computer vision framework for self-supervised learning.
LightlySSL is a modular framework that exposes low-level building blocks, such as loss functions and model heads, in an easy-to-use API. It is written in a PyTorch-like style. It also supports custom backbone models for self-supervised pre-training and distributed training using PyTorch Lightning.
You can install the package from PyPI using pip as follows:
pip install lightly
LightlySSL offers simple abstractions and model implementations for 10+ Self-Supervised Learning frameworks. Using some helper modules from the library, we can create a simple PyTorch Module that implements the SimCLR framework.
from lightly.models.modules import SimCLRProjectionHead

class SimCLR(nn.Module):
	def __init__(self, backbone):
		super().__init__()
self.backbone = backbone
self.projection_head = SimCLRProjectionHead(512, 512, 128)
def forward(self, x):
x = self.backbone(x).flatten(start_dim=1)
z = self.projection_head(x)
return z
- We import the SimCLRProjectionHead module from the models’ submodule, which allows us to implement the “projector” network.
- This implementation takes a backbone model as input but is flexible and allows using any model class as the backbone.
- In the forward method, we pass the input to the backbone model and flatten the output to generate intermediate representations
- These intermediate representations are then passed to the projection head to generate the final embeddings for a given input.
Let’s use the resnet18 model from torchvision as our backbone and instantiate a SimCLR model.
import torchvision
from torch import nn

resnet = torchvision.models.resnet18()
backbone = nn.Sequential(*list(resnet.children())[:-1])
model = SimCLR(backbone)
LightlySSL also implements various augmentations that are usually used in self-supervised learning methods. For SimCLR, we can use the predefined SimCLRTransform class.
from lightly.transforms.simclr_transform import SimCLRTransform

transform = SimCLRTransform(input_size=32, gaussian_blur=0.0)
dataset = torchvision.datasets.CIFAR10(
"datasets/cifar10", download=True, transform=transform
In this example, we see that the transforms available in LightlySSL are compatible with torchvision datasets
What about training? That can also be greatly simplified.
from lightly.loss import NTXentLoss

criterion = NTXentLoss()

for epoch in range(10):
	total_loss = 0
	for batch in dataloader:
		x0, x1 = batch[0] x0 = x0.to(device) x1 = x1.to(device)
		z0 = model(x0)
		z1 = model(x1)
		loss = criterion(z0, z1)
		total_loss += loss.detach()
		loss.backward()
		optimizer.step()
		optimizer.zero_grad()
avg_loss = total_loss / len(dataloader)- We use the NTXentLoss implementation available in the loss submodule
The entire training code can be found in lightly/examples/.
If you are using PyTorch Lightning, LightlySSL integrates seamlessly with Lightning Modules.
class SimCLR(pl.LightningModule):
	def __init__(self):
		super().__init__()
		resnet = torchvision.models.resnet18()
		self.backbone = nn.Sequential(*list(resnet.children())[:-1])
		self.projection_head = SimCLRProjectionHead(512, 2048, 2048)
		self.criterion = NTXentLoss()
	def forward(self, x):
		x = self.backbone(x).flatten(start_dim=1)
		z = self.projection_head(x)
		return z
	def training_step(self, batch, batch_index):
		(x0, x1) = batch[0]
		z0 = self.forward(x0)
		z1 = self.forward(x1)
		loss = self.criterion(z0, z1)
		return loss
	def configure_optimizers(self):
		optim = torch.optim.SGD(self.parameters(), lr=0.06)
		return optim

trainer = pl.Trainer(max_epochs=10, devices=1, accelerator=accelerator)
trainer.fit(model=model, train_dataloaders=dataloader)
For more detailed reference code and pretrained models, refer to the LightlySSL docs.
Pro Tip: For many use cases, you don’t actually need to train SimCLR from scratch. Refer to our tutorial on fine tuning lightly checkpoints.
You can download these and fine-tune or evaluate them on your own task.
See Lightly in Action
Curate and label data, fine-tune foundation models — all in one platform.
Book a Demo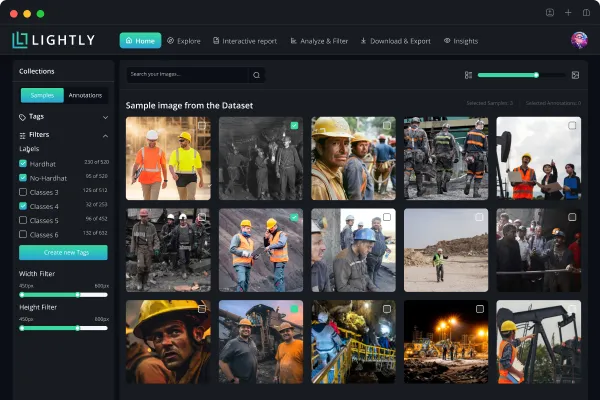
Evaluating Self-Supervised Representations: Linear Classifier and Fine-Tuning
Since Self-Supervised Learning methods are trained to generate high quality representations rather than some generic output such as the class of an image or the depth at some point, evaluating the self supervised representations learned by such models requires a different methodology.
Linear Evaluation Protocol
The standard way to evaluate representations learned via SimCLR (and other self-supervised methods) is the linear evaluation protocol. After pretraining the model (freezing the base encoder), one trains a simple linear classifier (a single-layer logistic regression or fully-connected layer) on top of the frozen representations to predict the labels on a dataset like ImageNet.
The idea is that if the model was successful in learning good features, a linear classifier trained on these representations will be able to achieve a high accuracy.

Semi-Supervised Fine-Tuning (Few Labels)
Another important evaluation method to be considered is how well the model performs when only a small fraction of labeled data are available – a semi-supervised learning scenario. Even with 10% of labels, SimCLR’s accuracy was far higher than earlier approaches. This demonstrates the practical value of SimCLR’s representations – they can be fine-tuned effectively with limited supervision, making it attractive for domains where labeling data is expensive.

Transfer Learning to Other Tasks
Beyond ImageNet classification, it’s important to test if SimCLR representations generalize to other vision tasks (detection, segmentation, etc.). The paper and follow-ups indicated strong transfer performance.
Additionally, the SimCLR paper evaluated transfer to several classification datasets (like CIFAR, VOC, etc.) – SimCLR was better on 5 out of 7 datasets compared to supervised learning. There were a couple of tasks where supervised was slightly better, but overall SimCLR proved to be a robust initialization across domains.
The evaluations confirmed that SimCLR’s self-supervised approach didn’t just learn some quirky task-specific embedding – it learned generally useful visual representations. Some follow up methods like DINO even proved that representations learnt using self-supervised training methods with vision transformers possess unique properties such as being able to do segmentation without explicitly being trained to do so!
SimCLR vs. Supervised Learning: Key Differences and Insights
Now, let’s briefly take a closer look at the comparison between SimCLR and Supervised Learning.
- Labels: SimCLR learns without human-provided labels, using positive (same image) vs. negative (different image) pairs. Supervised learning relies on annotated class labels.
- Training Objective: Supervised models use cross-entropy loss for class prediction. SimCLR uses contrastive loss (NT-Xent) to separate individual image instances.
- Data & Efficiency: SimCLR requires more compute (e.g., 800+ epochs, large batch sizes) to match supervised performance. Supervised models (e.g., ResNet-50) reach peak accuracy with far fewer epochs. However, SimCLR excels when unlabeled data is abundant and labeling is costly.
- Performance: SimCLR can match or outperform supervised models, especially in low-label scenarios. A common strategy: try both SimCLR and supervised pretraining, and choose the best for your task. The performance gap is narrowing in favor of self-supervised methods.

SimCLR Conclusion and Further Developments
Self-supervised learning has largely replaced supervised pretraining by enabling models to learn from unlabeled, web-scale data, making it ideal for transferable representation learning.
SimCLR uses contrastive learning, training models to recognize different augmented views of the same image as similar, and distinguish them from views of other images. This encourages the model to learn meaningful features without labels.
Such learning signals come directly from the data — like masked inputs or augmented views — making the approach flexible and scalable.
Finally, SimCLR can be easily implemented using libraries like LightlySSL with PyTorch or PyTorch Lightning.

Stay ahead in computer vision
Get exclusive insights, tips, and updates from the Lightly.ai team.

.png)
.png)