Embedded COVID mask detection on an Arm Cortex-M7 processor using PyTorch
Table of contents
Share blog post


How we built a visual COVID-19 mask quality inspection prototype running on-device on an OpenMV-H7 board and the challenges on the way.
Share blog post
How we built a visual COVID-19 mask quality inspection prototype running on-device on an OpenMV-H7 board and the challenges on the way.
TLDR; The source code to train and deploy your own image classifier can be found here: https://github.com/ARM-software/EndpointAI/tree/master/ProofOfConcepts/Vision/OpenMvMaskDefaults
In the summer of 2020, we worked with Arm to build an easy-to-use tutorial on how to train and deploy an image classifier on an Arm microcontroller. In this post, we show how we approached and solved the following challenges:
- Convert a PyTorch ResNet to TensorFlow and quantize it to use 8-bit integer values
- Collect, select, and annotate data of faulty and non-faulty masks
- Use self-supervised pre-training to boost model performance when working on fewer images.
The Results to Expect
The goal of this project was to show an end-to-end workflow on how to train and deploy a convolutional neural network to an OpenMV-H7 board.
The video below showcases how our classifier detects faulty masks in real-time.
The OpenMV-H7 Board
The board consists of an STM32H743VI Arm Cortex-M7 processor running at 480MHz, multiple peripherals, and a camera module mounted on it.
The camera module has an OV7725 sensor from OmniVision and can record in VGA resolution (640x480) at 75 FPS.
Since the board has limited computing power and memory, we aimed for a very small deep learning model. We call the variant ResNet-9 since it’s more of a cut in half ResNet-18 variant. Below you can find some numbers about the model configuration, runtime, and other metrics.
- Input size: 64x64x3
- CPU Freq.: 480 MHz
- Operations: 33.4 MOp
- Model size: 90 kBytes
- Inference Time: 150 ms
- Operations/s: 249 MOp/s
Detailed specs can be found on the official website of OpenMV here.

Data Collection
Neural networks are very data-hungry. In order to efficiently collect enough training data we did the following:
- We used the camera on the OpenMV-H7 board to record video sequences. With the USB interface and the OpenMV IDE, we were able to easily record the camera stream and save it as a video file.
- To simulate a real production line we mounted the camera on cardboard to make sure the camera is stable. The optics point to the production line which is a metal plate with tall borders. This setup ensures, that the camera sees defect and non-defect masks within the same environment.
- Finally, we moved masks through our inspection line using a combination of push and pull.

Data Selection and Annotation
At this stage we have multiple video files, each having captured a few minutes. The next challenge is to extract the frames and annotate the data. We use FFmpeg for the frame extraction and Lightly to select a diverse set of frames. Note that we had more than 20k frames but no time to annotate all of them. Using Lightly we selected a few hundred frames covering all relevant scenarios.
Lightly uses self-supervised learning to get good representations of the images. It then uses these representations to select the most interesting images which should be annotated. The benefit of this method is that we can access the pre-trained model and fine-tune it on only a handful of labeled images.

Model Fine-Tuning
To prevent the model from overfitting, we simply froze the pre-trained backbone and added a linear classification head to the model. We then trained the classifier for 100 epochs on a total of 500 annotated images.
From PyTorch to Keras to TensorFlow Lite
Moving the pre-trained PyTorch model to TensorFlow Lite turned out to be the most difficult part of our endeavor.
We tried out several tricks with ONNX to export our model. A simple library called pytorch2keras worked fine for a model only consisting of linear layers but not for our conv + linear model.
The main problem we encountered, was that PyTorch uses the CxHxW (channel, height, width) format for tensors whereas TensorFlow uses HxWxC. This meant that, after transforming our model to TensorFlow Lite, the output of the layer just before the classifier was permuted, and hence, the output of the classifier was incorrect. In order to address this problem, we considered manually permuting the weights of the linear classifier.
However, we decided to go for a simpler solution. We pooled the output of the last convolutional layer into a Cx1x1 shape. That way, changing the order of the channels does not affect the output of the neural network.
The final step is to quantize and export the Keras model to TensorFlow Lite. In our case quantization reduces the model size and speeds up running the model in inference at the cost of a few percent lower accuracy.
Special thanks to our collaborators at Arm and Philipp Wirth from Lightly for making this project possible. The full source code is available here. You can easily train your own classifier and run it on an embedded device. Feel free to reach out or leave a comment if you have any questions!
Igor, co-founder
Lightly.ai
See Lightly in Action
Curate and label data, fine-tune foundation models — all in one platform.
Book a Demo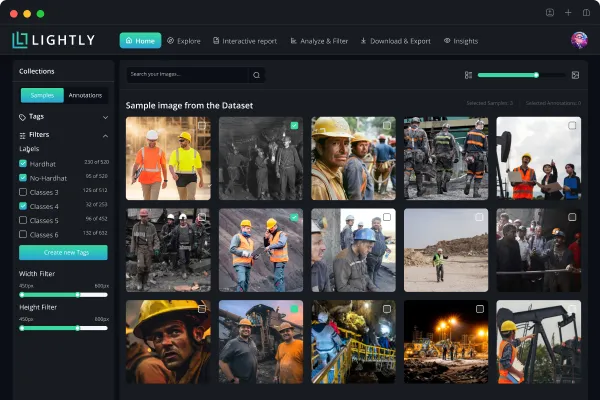

Stay ahead in computer vision
Get exclusive insights, tips, and updates from the Lightly.ai team.

.png)
.png)